Read in a map and model
The very first thing we need to do for model building is to read in experimental data (maps, reflections) and a model. Here, we learn how to read in existing files from the Phenix regression directory.
When you have Phenix installed, you automatically get tutorial, testing, and demo data files that come with Phenix. We’ll use some of those in this tutorial. Let’s make a new directory to work in and put the files we need there. In a terminal window type:
phenix.setup_tutorial tutorial_name=model-building-scriptingThis creates the directory model-building-scripting. Let’s change our working directory to this directory:
cd model-building-scriptingIt is pretty easy to set up the high-level model-building tools. As an example, let’s read in a map and working model and get ready to fit a ligand into the map.
Type phenix.python to start up Python with the Phenix environment all set up:
phenix.pythonNow let’s set up a DataManager that knows how to read and write files. Paste these commands in to your terminal window after starting up with phenix.python (Note: everything after the hash mark is a comment and is ignored, and also note that you are usually not allowed to have spaces before the start of a command):
from iotbx.data_manager import DataManager    # Load in the DataManager
dm = DataManager()             # Initialize the DataManager and call it dm
dm.set_overwrite(True)         # Overwrite files with the same name
The DataManager has many useful functions for reading and writing files. Here we are going to use a function that can read in a map and a model that we specify and that creates a map_model_manager from the map and model:
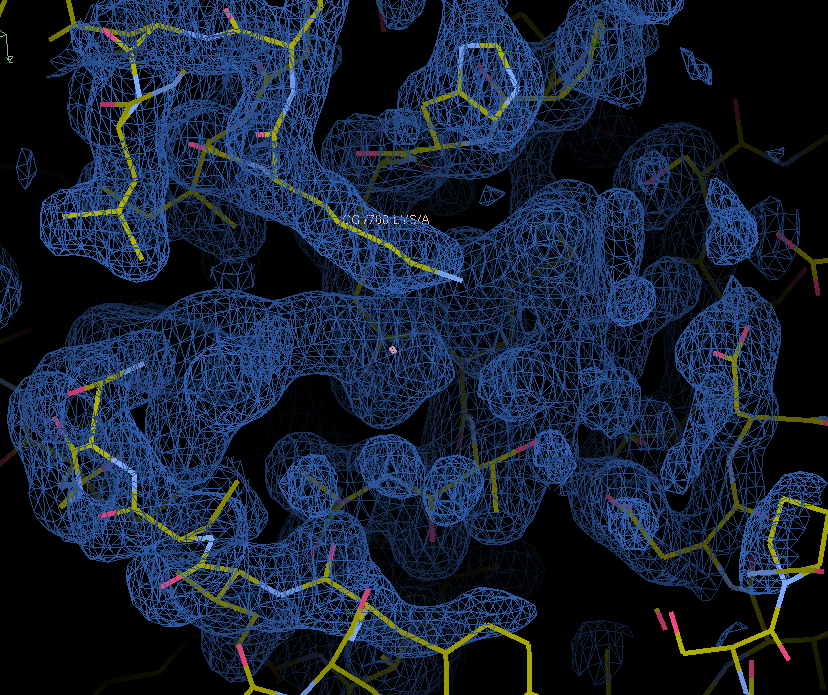
The map and model with unmodeled ligand density are in the in the model-building regression directory. Note the unmodelled density in the center of the screenshot.
Let’s read the map and the model in and create a map_model_manager. Just cut and paste this command into your terminal window:
mmm = dm.get_map_model_manager(        # getting a map_model_manager
  model_file="boxed_ligand_map.pdb",   # model file
  map_files="boxed_ligand_map.ccp4")   # map file
We can summarize the map and model just by typing the word mmm:
mmm # summarize the map_model_manager
This will produce a short summary of the model-manager (unit cell, space group, number of chains and residues, coordinate shift from its original location), and of the map_manager (original file name, unit cell, space group, gridding of the unit cell, part of the unit cell that is present, and coordinate shift from its original location):
Map_model_manager:

Model manager
Unit cell: (115.986, 115.986, 44.151, 90, 90, 120) Space group: P 6 (No. 168)
Chains: 1 Residues 247
Working coordinate shift (-6.95916000366212, -21.696513667819186, -27.13446935017904)

map_manager:
Map manager (from $build_phenix/modules/phenix_regression/model_building/boxed_ligand_map.ccp4)
Unit cell: (115.986, 115.986, 44.151, 90, 90, 120) Space group: P 6 (No. 168),
Unit-cell grid: (250, 250, 96), (present: (66, 67, 35)), origin shift (42, 54, 59)
Working coordinate shift (-6.95916000366212, -21.696513667819186, -27.13446935017904)
First let’s tell the map_model_manager mmm about the resolution of the map. This is used later in fitting the ligand and in model-building.
mmm.set_resolution(3.0) # working (nominal) resolution of map
Let’s also tell the map_model_manager mmm about the experiment type (cryo_em or xray). This information can be used later in refinement.
mmm.set_experiment_type('xray') # define experiment type
Now we are ready to work with this map_model_manager containing a map and model. Let’s save a copy so we can come back to this place any time:
mmm_saved = mmm.deep_copy() # save a copy of the map_model_manager